Related Subjects:
|Chest drain Insertion (Thoracostomy)
|Simple Needle Aspiration for Spontaneous Pneumothorax
|Pleural tap (thoracentesis)
🫁 Chest drain insertion is a potentially life-saving procedure used to drain air or fluid from the pleural space.
It may be required for pneumothorax, haemothorax, pleural infection, malignant pleural effusion or other significant pleural collections.
⚠️ In most stable patients, confirm the diagnosis and site with imaging before insertion.
Exception: suspected tension pneumothorax with physiological compromise requires immediate needle decompression, followed by definitive pleural drainage.
📖 About
- 🫁 Historically, large-bore drains, for example 24–32 Fr, were commonly inserted through a surgical incision.
- 🪛 Modern practice increasingly uses smaller percutaneous drains, often inserted by the Seldinger technique.
- 📏 Small-bore drains, usually 8–14 Fr, are often effective for pneumothorax and many pleural effusions.
- ✅ Smaller drains are generally less painful and may be better tolerated.
- ⚠️ Larger drains may still be needed for trauma haemothorax, thick pus, blood clot or high-volume air leak.
- 🧍 In very obese patients, standard short cannulae or drains may not reach the pleural cavity safely.
🧠 Pathophysiology
- 🌬️ In pneumothorax, air enters the pleural space and abolishes the normal negative pleural pressure, allowing the lung to recoil inward.
- 💧 In pleural effusion, fluid accumulates between the visceral and parietal pleura and can restrict lung expansion.
- 🩸 In haemothorax, blood in the pleural space may impair ventilation and can clot, making drainage more difficult.
- 🦠 In empyema, infected fluid or pus may become loculated and require drainage plus antibiotics.
🛡️ Precautions
- 👨⚕️ Chest drains should be inserted by trained competent staff, or by trainees under direct supervision.
- 🧼 Use strict aseptic technique to reduce infection risk.
- 🩻 Use imaging guidance where appropriate, especially for pleural fluid, loculated collections or uncertain anatomy.
- 🩸 Check anticoagulation and coagulation status where time allows, but do not delay life-saving drainage in extremis.
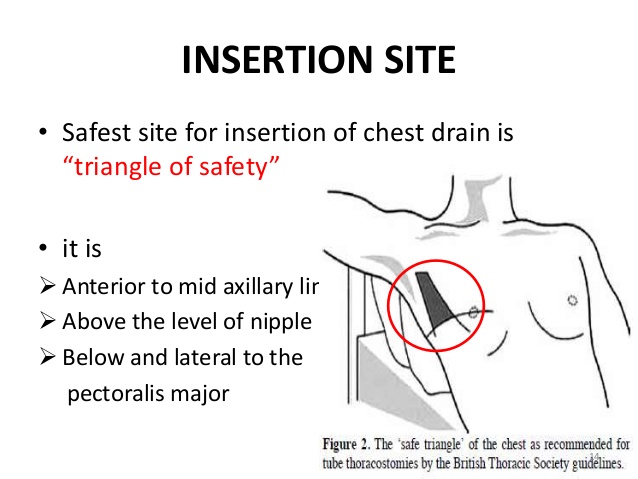
- 📍 Insert in the safe triangle where possible to reduce the risk of injury to abdominal organs, vessels and nerves.
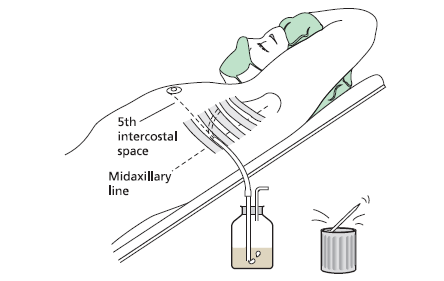
🔺 Safe triangle: bordered anteriorly by the lateral edge of pectoralis major, posteriorly by the anterior edge of latissimus dorsi, inferiorly by a line around the 5th intercostal space, and superiorly by the base of the axilla.
Insert just above the upper border of the rib to avoid the intercostal neurovascular bundle, which runs beneath each rib.
⛔ Contraindications / Cautions
- 🩸 Coagulopathy or anticoagulation increases bleeding risk; correct where possible if the situation is not immediately life-threatening.
- 🧬 Pleural adhesions, previous thoracic surgery or loculated collections increase technical difficulty.
- 🫁 Bullous lung disease increases risk of lung injury if the anatomy is uncertain.
- ⚠️ In unstable patients, the risk of not draining the chest may outweigh procedural risks.
📍 Absolute / Emergency Indications
- 🚨 Tension pneumothorax after immediate decompression.
- 🩸 Significant traumatic haemothorax.
- 💔 Traumatic cardiac arrest or peri-arrest with suspected chest cause, often requiring bilateral thoracostomies/drains.
- 🫁 Large or symptomatic pneumothorax with physiological compromise.
📍 Other Indications
- 🫁 Pneumothorax with persistent symptoms, failed conservative management or failed aspiration.
- 🧓 Secondary spontaneous pneumothorax, especially with breathlessness, hypoxia or limited respiratory reserve.
- 🦠 Empyema or complicated parapneumonic effusion.
- 🎗️ Symptomatic malignant pleural effusion requiring therapeutic drainage or pleurodesis.
- 🩻 Large pleural effusion causing breathlessness, after appropriate diagnostic assessment.
- 🫁 Patients requiring positive pressure ventilation with pneumothorax.
👨⚕️ Teaching pearl: In major trauma, if the patient is in extremis and has unilateral chest signs, do not wait for imaging before emergency decompression or thoracostomy.
In stable patients, image first and plan the safest site.
🧰 Equipment
- 🧤 Sterile gown, gloves, antiseptic solution and sterile drapes.
- 💉 Local anaesthetic, usually 1% lidocaine.
- 🔪 Scalpel, sutures, dressing and securing device.
- 🪛 Chest drain kit: Seldinger kit or blunt dissection equipment depending on technique.
- 🧷 Clamp/forceps for blunt dissection technique.
- 🫁 Appropriate size chest tube.
- 💧 Underwater seal drainage system or ambulatory one-way valve where appropriate.
📏 Chest Drain Size
| Situation |
Typical drain choice |
| 🌬️ Pneumothorax |
Small-bore drain, often 8–14 Fr |
| 💧 Simple pleural effusion |
Small-bore drain often adequate |
| 🦠 Pleural infection |
Small-bore drain often used initially, with imaging guidance where possible |
| 🩸 Traumatic haemothorax |
Larger drain, often 24–32 Fr, to reduce clot blockage |
| 💊 Pleurodesis |
Usually ≥12 Fr depending on local protocol |
🪛 Seldinger Chest Drain Technique
- 🗣️ Explain the procedure, obtain consent where possible and confirm side/site.
- 🛏️ Position the patient comfortably, usually sitting up or slightly reclined.
- 🧼 Wash hands, use sterile gown/gloves, clean the skin and apply drapes.
- 💉 Infiltrate local anaesthetic from skin down to pleura. For plain 1% lidocaine, remember 10 mg/mL; a common maximum is 3 mg/kg.
- 🪡 Insert the introducer needle just above the upper border of the rib while aspirating gently.
- 💨 Aspiration of air or fluid confirms pleural entry.
- 🧵 Pass the guidewire through the needle, then remove the needle while keeping the wire stable.
- 🔪 Make a small skin nick if required.
- 🪛 Dilate the tract gently using the supplied dilator.
- 🫁 Feed the drain over the guidewire into the pleural space, commonly to around 12 cm in adults depending on drain type and patient habitus.
- ⚠️ Remove the guidewire and any obturator; never leave the guidewire in place.
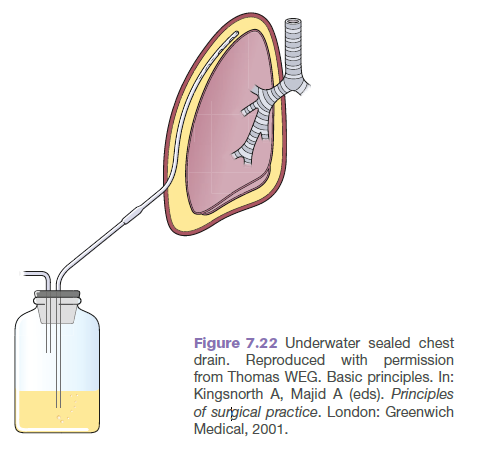
- 💧 Connect to an underwater seal drain below the level of the patient.
- 🔍 Swinging of fluid and bubbling with cough may support correct function, depending on the indication.
- 🧷 Secure the drain with sutures and an appropriate dressing.
- 🩻 Obtain a post-procedure chest X-ray to confirm position and response.
🪛 Traditional Blunt Dissection Technique
- 🗣️ Explain the procedure, obtain consent where possible and confirm side/site.
- 🧼 Prepare with full aseptic technique and local anaesthetic down to the pleura.
- 🔪 Make a 2–3 cm incision just above the upper border of the rib.
- 🧷 Bluntly dissect through the intercostal muscles using forceps or a clamp.
- ☝️ Insert a finger to confirm entry into the pleural space and sweep gently for adhesions.
- 🫁 Advance the drain into the pleural cavity, usually directed apically for air and basally/posteriorly for fluid, depending on clinical aim.
- 💧 Connect to underwater seal drainage.
- 🧷 Secure with sutures and apply a sterile dressing.
- 🩻 Confirm position and effect with post-procedure imaging.
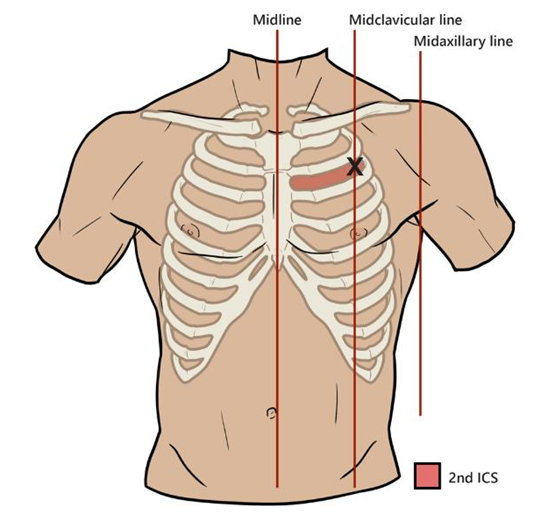
📍 Landmarks
💧 Drainage Systems
- 💧 Underwater seal: acts as a one-way valve, allowing air or fluid to leave the pleural space without re-entry.
- 🎈 Flutter valve / Heimlich valve: one-way valve sometimes used for ambulatory pneumothorax management.
- 🧲 Suction: may be used in selected cases such as persistent air leak or incomplete lung expansion, usually after senior/respiratory advice.
📈 Monitoring
- 🩻 Perform post-procedure chest X-ray to confirm drain position and lung re-expansion.
- 🌬️ Observe for ongoing bubbling, which may indicate an air leak.
- 💧 Check fluid swing; absent swing may mean blockage, kinking, malposition or that the drain has completed its role.
- 📊 Record drainage volume, colour and rate.
- ⚠️ For large effusions, drain gradually and pause if the patient develops chest pain, persistent cough, distress or vasovagal symptoms.
- 🫁 Monitor oxygen saturations, respiratory rate, pain, drain site and signs of surgical emphysema.
🗑️ Removal
- ✅ Remove once the indication has resolved, the lung is expanded and there is no ongoing clinically significant air leak or drainage.
- 🧪 Clamping before removal is variable and should follow local policy; avoid clamping a bubbling drain unless specifically advised.
- 🫁 During removal, ask the patient to perform Valsalva or time removal with expiration according to local practice.
- 🧵 Close the wound with the pre-placed suture or mattress suture and apply an occlusive dressing.
- 🩻 Consider repeat imaging after removal, especially if symptoms recur or local policy requires it.
⚠️ Acute Complications
- 📍 Malposition or subcutaneous placement.
- 🩸 Intercostal vessel injury causing bleeding or haemothorax.
- 🫁 Lung laceration, especially with adhesions or bullous disease.
- 🫀 Injury to heart or great vessels, rare but catastrophic.
- 🧍 Diaphragm, liver, spleen, stomach or colon injury if inserted too low.
- 🫧 Surgical emphysema.
- 🌊 Re-expansion pulmonary oedema, rare but potentially serious.
- 😰 Pain, vasovagal episode or procedure-related distress.
- 🧷 Tube dislodgement if poorly secured.
⚠️ Late Complications
- 🚫 Drain blockage due to clot, pus, debris or kinking.
- 🩸 Retained haemothorax.
- 🦠 Drain site infection or empyema.
- 🔁 Recurrent pneumothorax after removal.
- 🩹 Persistent air leak or bronchopleural fistula.
💡 Exam Tip
🧠 Stable patient: image first, choose the safest site and use the least invasive effective option.
🚨 Tension pneumothorax: diagnose clinically and decompress immediately.
🔺 Safe triangle + above the rib are the two key anatomy points examiners love.
📚 References
